How to flash Bootloader to Arduino boards
Pre-program or wipe out faulty firmware microcontrollers
Overview#
The idea of using Arduino and how it accelerates the process of programming and uploading code to the board was explained in the Makefile tutorial ↗, check it out if you have a vague idea of what is the ultimate goal here.
The concept of Bootloader is similar to the BIOS of a computer if you have ever heard of. The Basic Input/Output System (BIOS) on your computer typically waits for a user input at startup (the ubiquitous “Press F1 to continue, Del to enter SETUP” screen) and provide options to modify Boot settings, i.e. CPU clock, peripherals, etc. and then proceed to load the Operating System (OS), e.g. Floating flag of Windows or an apple in macOS.
 The bootloader program is written in the bootloader section, and the application program is written in the application section
Here, in the embedded system, Bootloader is an initial piece of code (usually 512 bytes ↗) which runs whenever a microcontroller is powered up or resets. It also looks for external inputs, i.e. uploading new program. Similarly, in case of no input, it executes the program that was uploaded previously.
Prerequisite#
-
Arduino IDE: Only the IDE is enough, if you want to know other toolchains, look into previous instruction ↗
-
Two (2) Arduino boards: One as the target board and one as the programmer board
-
USB-AVR-ISP (Optional): Advance, Bootload without the need for another programmer board
Understanding Bootloader#
Arduino board implements AVR microcontrollers which has program memory and bootload memory sections. They are used to simplify the process of uploading programs to the microcontrollers as well as initializing IO devices before they begin the main application program, e.g. Initialize Analog-to-Digital-Conversion (ADC) pins.
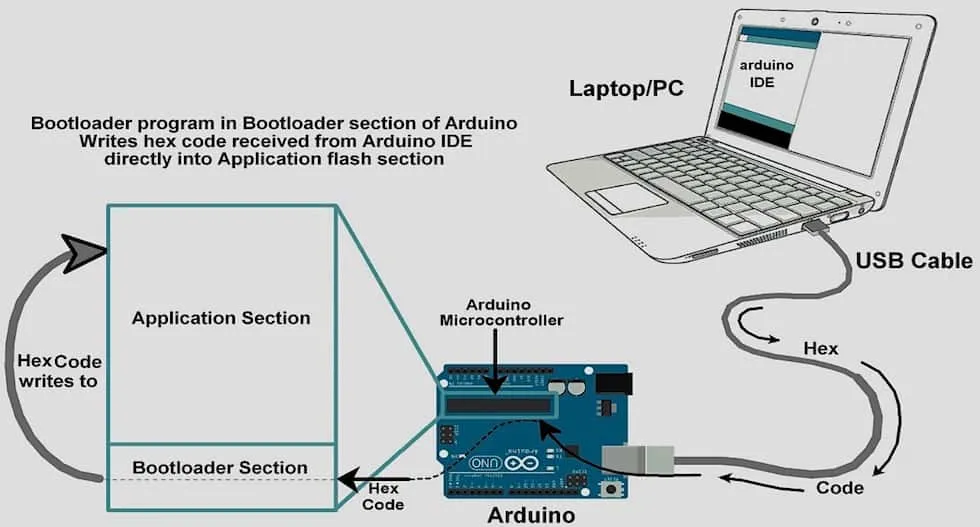
Essentially, the bootloader is a .hex code and it initially watching dedicated pins for a new program to be uploaded, then using simple serial communication (in case of Arduino Uno, UART. More about the protocol ↗) to download the program and write it into the application flash memory.
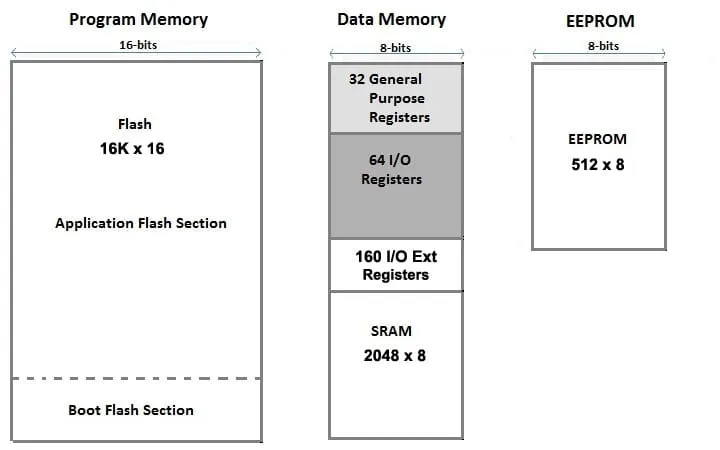 Arduino Uno (ATmega328p) Memory Map
Luckily, Arduino provides you a built-in written Bootloader program within the IDE serving for this exact purpose at “File Examples ArduinoISP”.
Bootloading any board#
Now with the Bootloader program ready, the rest is to physically setup a way for the programmer board and target board to communicate.
Circuit Examination#
The setup utilizes Serial Peripheral Interface, a synchronous four-wire communication protocol with master-slave scheme, i.e. the programmer-target board. More about SPI protocol here ↗.
Beside power pins, peripheral pins such as ADC, GPIO on any Arduino board, another set of pins called In Circuit Serial Programming (ICSP) header. These will give direct (serial) access to the main microcontroller on the board and will be the entry point.
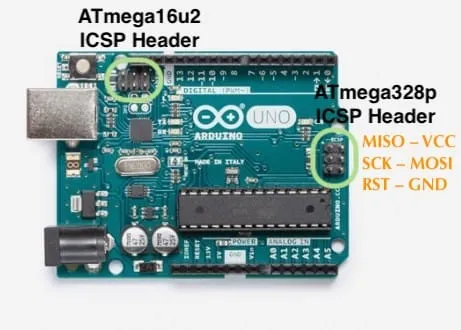 From top left: Master In Slave Out, +VCC Positive Supply, Serial Clock, Master Out Slave In, Reset and Ground
Not only that, for some boards such as the ubiquitous Arduino Uno or Mega, they contains another set of SPI pins beside the ICSP header and are** completely functional **which can also be utilized for Bootloading.
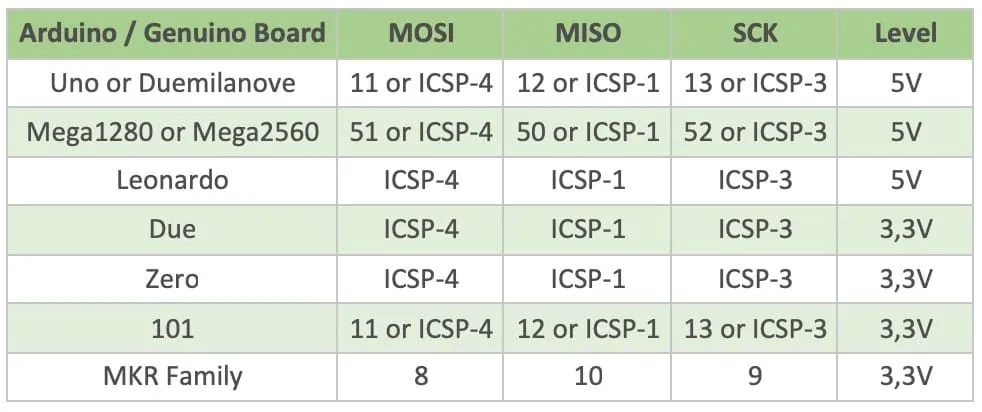 It is important to notice that some only contain either and not both sets of pin, wire your board accordingly to either Digital pins scheme or ICSP header
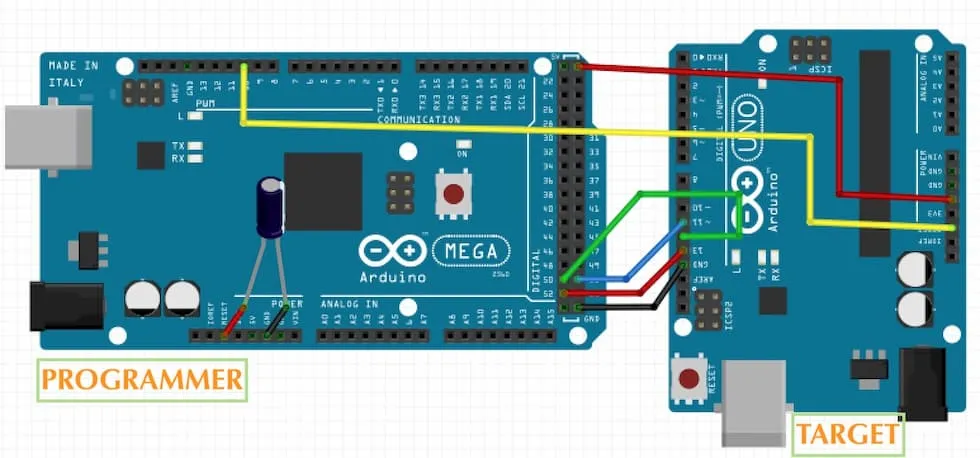
Hardware Setup#
No matter how the Digital pins or ICSP headers were connected, the idea remains the same. That is, connect pins in SPI scheme from the Programmer board to that of the Target board in order to upload Bootloader on the microcontroller of the Programmer board to the one on the Target board.
It is also important to remember that, the power comes from the Programmer board which can originated from your USB port or an external supply and then will be shared with the Target board.
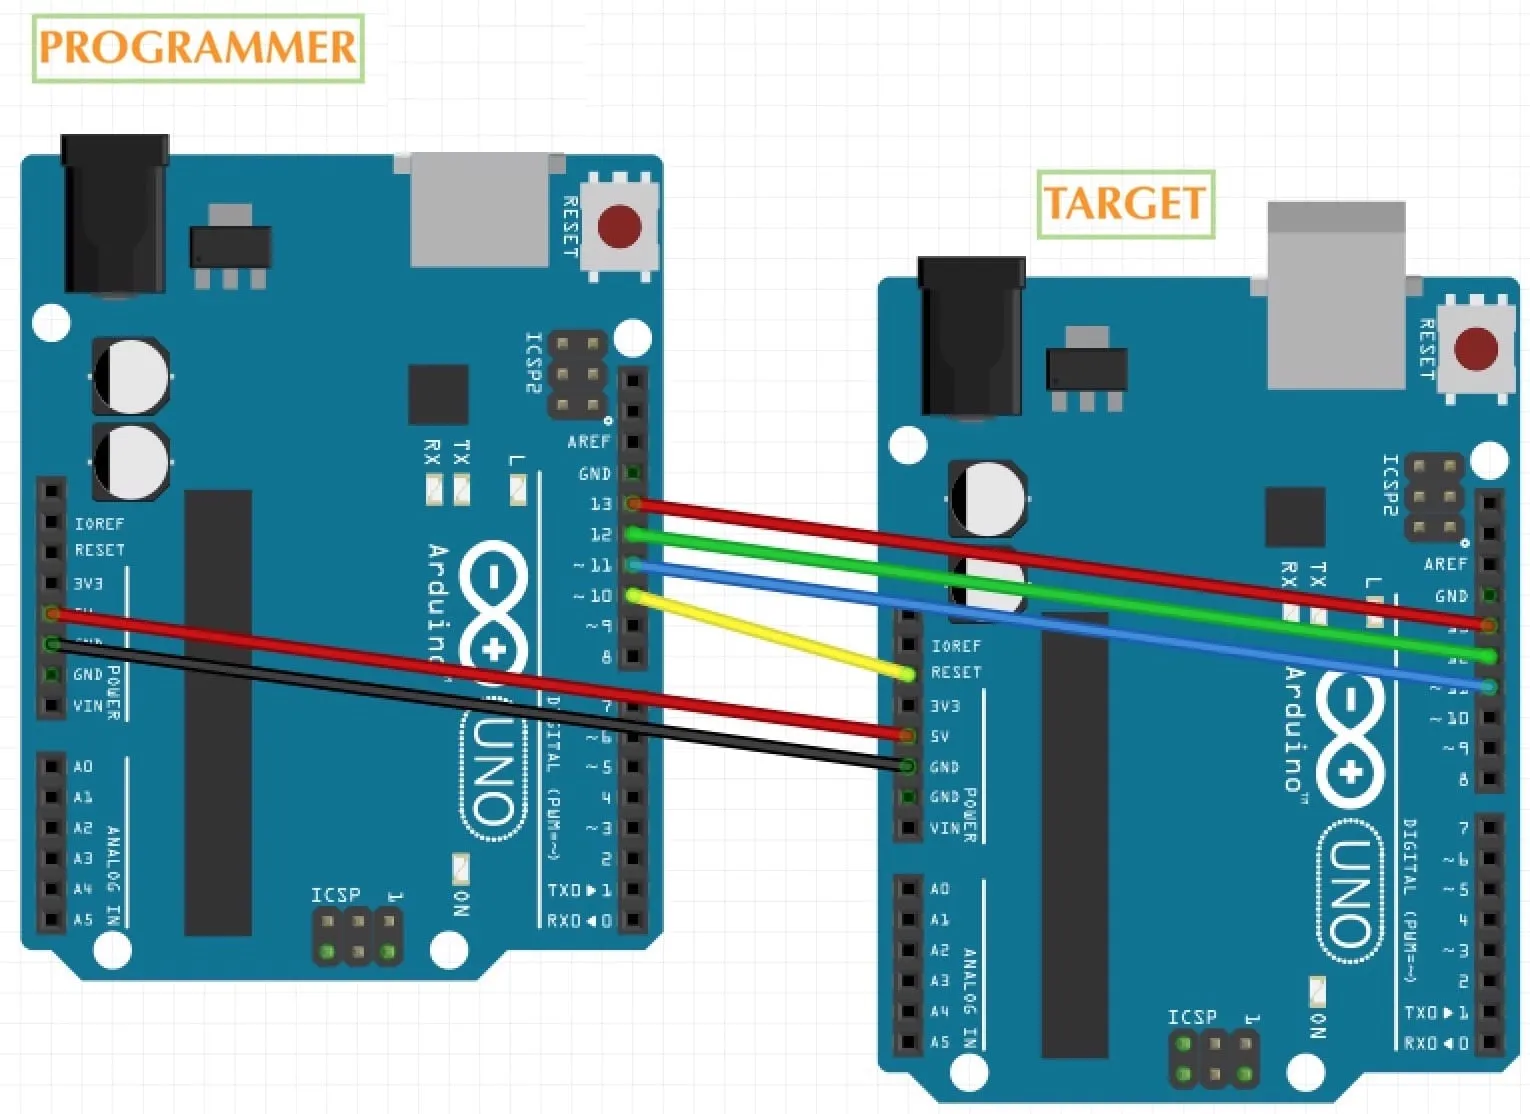
Bootloader procedure pin map using Digital Pin (applicable for Uno, Mega) Refer to the Pin Map in previous section. Schematic: Fritzing on macOS
 This is to diminish the unwanted reset signal sent every time the Programmer attempts to establish connection with the Target in Bootload mode.
Bootloading Procedure#
Now that everything is clear, the procedure first took place with ONLY the Programmer WITHOUT any connection to the Target board.
-
Step 1: From Arduino IDE, Open the previously mentioned Bootloader firmware in the Arduino IDE in “File Examples ArduinoISP”.
-
Step 2: Select the model of Programmer board in “Tool Board” (E.g. Arduino Mega) menu and the Serial Port in “Tool Port” (E.g. /dev/cu.usbserial1410) menu.
Side note: Connected device port on macOS can also be identified using list command directly in Terminal, either ls /dev/cu.* or less common ls /dev/tty.* command.
- Step 3: Select Upload button in the IDE and proceed to load the ArduinoISP sketch to your Programmer board.
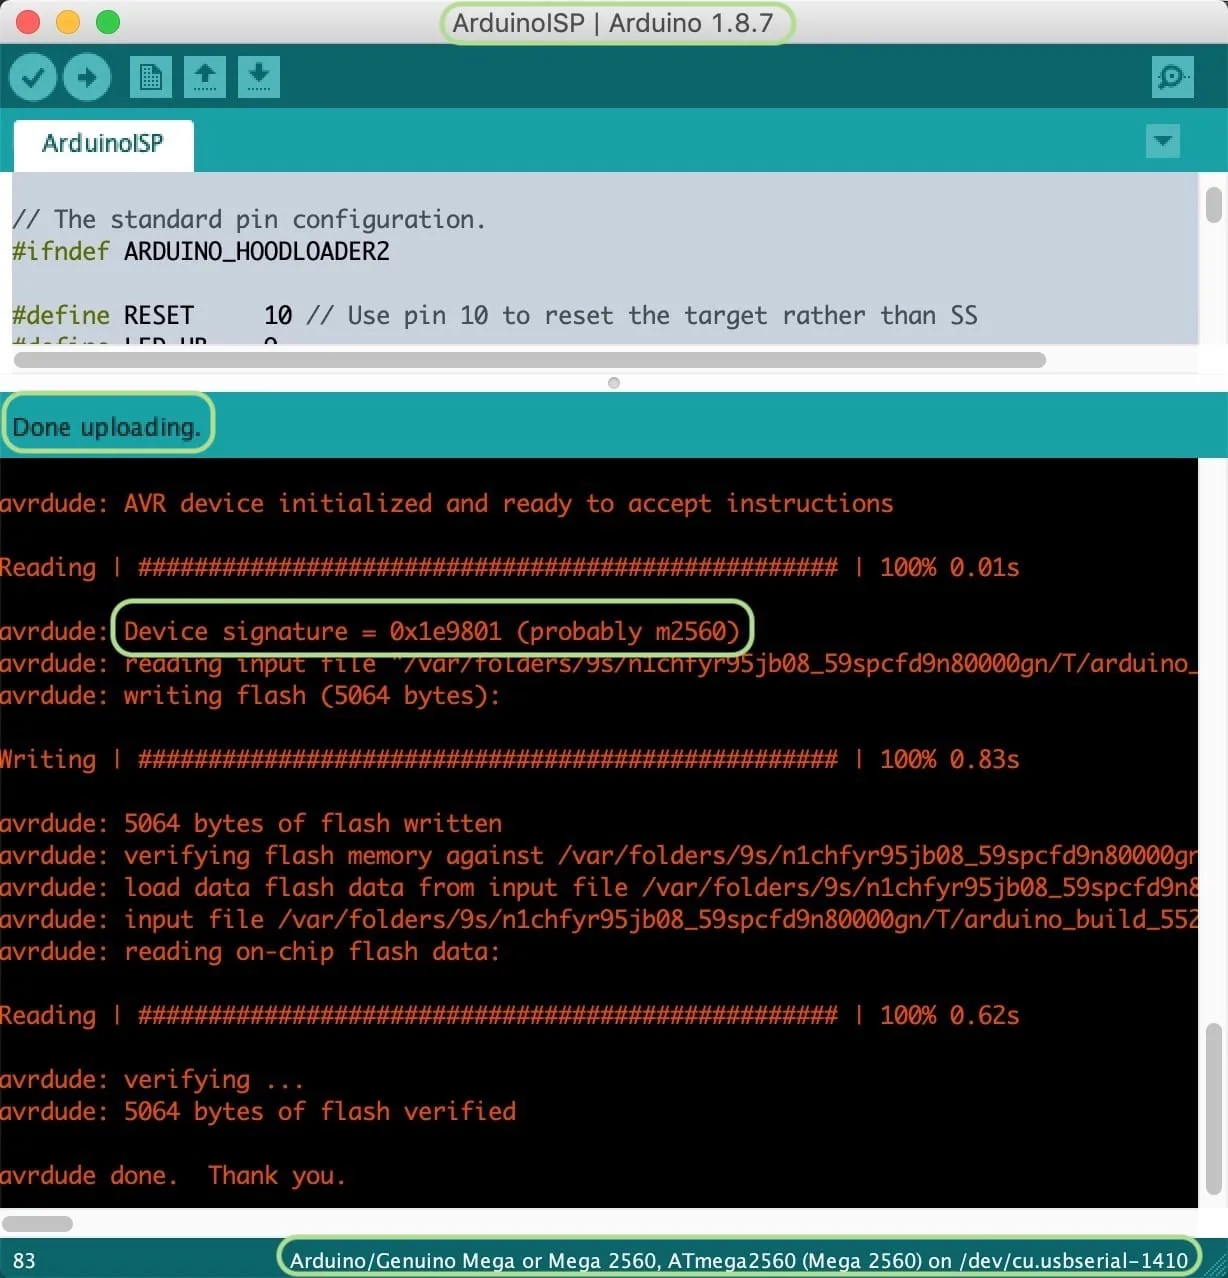 Successfully upload Bootloader Firmware onto the Programmer’s microcontroller
Now, the Bootloader is currently on the microcontroller of your Programmer board and is ready to be burned onto the Target board.
- Step 4: Wiring the Target Board to the Programmer as in previous Hardware Setup, either ICSP header or SPI Digital Pins.
Side note: Also remember the capacitor for Arduino Mega which was explained previously.
-
Step 5: Back to the IDE, Select the model of Target board in “Tool Board” (E.g. Arduino Uno) menu and the Programming Mode as Arduino as ISP in “Tool Programmer” (Originally AVRISP mkII).
-
Step 6: Lastly, select the Burn Bootloader command, i.e. “Tool Burn Bootloader”.
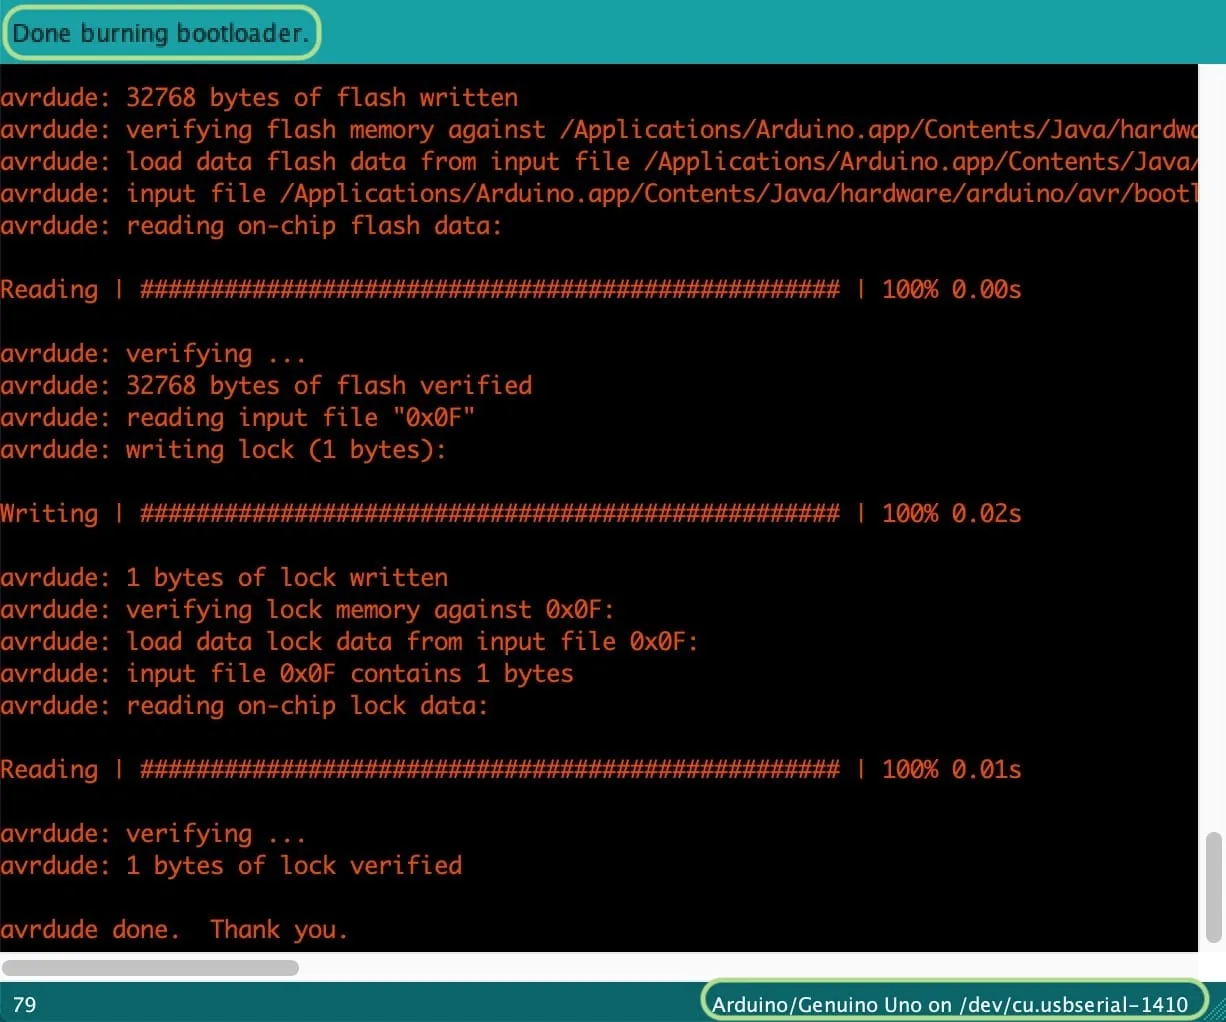 Successfully bootloaded a
 Target Arduino Uno (ATmega328p) using a Programmer Arduino Mega (ATmega2560)
Troubleshooting (Extra)#
“avrdude: Yikes! Invalid device signature.”
This is usually due to mismatch in hardware interface as well as software configuration and is an indication of selected wrong Target board. There are some issues need to be taken into consideration:
-
Board Selection: Re-trace any step to select ↗ the correct board model, microcontroller variant (some have different architecture and signature)
-
Schematic Setup: Re-trace the setup ↗ for SPI protocol and/or the ICSP header pin map (if used)
-
Metallic Contact: Avoid any contact with the spikes on the back of the board. Trust me, I learned that the hard way !